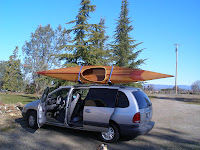
This was my first kayak build - a Guillemot Great Auk. For my first build, I selected a large, stable kayak for several reasons. First was the need to refresh old skills before moving to a more aggressive, higher performance design. Second was the desire to have a multi-function kayak for cruising, camping and fishing. Third, I wanted a kayak that would be stable and easy to paddle for beginning paddlers. Fourth, I wanted a kayak on which I could learn the new skills I needed for kayak construction - bending and shaping wood and fiberglassing. Fifth, since I have size 12 feet and long legs, I wanted a large, comfortable kayak.
I purchased Nick Schade's book "
The Strip-Built Sea Kayak" and since I have access to AutoCad and large format printers, I lofted the plans offsets provided in the book. I then cut and routed the cove and bead on the strips. A note here - if you have access to wood working equipment (table saw, jigsaw, router as a minimum), this is a great way to go and very satisfying. If you lack the equipment, I would recommend purchasing a kit from one of the kit suppliers.
At this point, I would like to make several comments on things I learned the hard way. Planning ahead saves a lot of time on the build procedures. At the start, I didn't realize how much time would be involved simply waiting for glue and epoxy to dry and cure. Take the time to assemble your full length strips several days before you need them. Let glue dry completely so that you don't end up regluing and repairing your work. That said, few mistakes result in complete disaster because the strip-building process is quite forgiving.
After gluing (sp

ray adhesive) the patterns to particle board, I rough cut them with a jigsaw and fine cut them on a bandsaw. The bandsaw does not tend to lift the edges of the paper patterns from the wood as the jigsaw does. The bow and stern forms were cut from 1x12 pine to allow shaping of the edges to the correct profile. Rough shaping was accomplished with a block plane, rasps and coarse sandpaper.
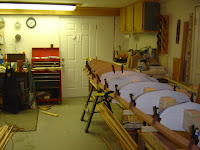
I built a strongback from 1/2" plywood per Nick's book. I have since purchased a 4"x2" aluminum tube for

the convenience of
re-usability.
I marked the strongback with the form positions and fit each one. I aligned the forms on the strongback with a square and a string line to line up the keel and shear lines. As I got each one set, I locked it in place with hot glue and wood blocks. Following this, I wrapped the edges of each form with duct tape to keep the glue between strips from gluing the strips to the forms. Make sure the tape you use does not stick to the glue you use. An alternate would be to wrap the entire form with plastic sheeting.
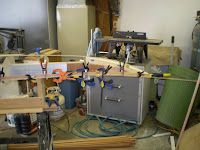
With everything locked in place, I was ready to place the first strip. Since I was working with 8' and 10' strips I created several full length strips by scarfing the ends and gluing two strips together.
I removed the bead and contoured the edge of the strip with the plane to provide a flat landing for the first deck strip. Placing this strip is one of the most difficult because there is no support for it and the alignment is very important to the rest of the build. I locked it in place with a combination of staples and small finishing nails (leave the heads up so you can pull them later). Again, following the directions from the book, I placed the strips with the cove side up. This makes it much easier to apply the glue for succeeding strips and with the pattern I followed, made it easier to shape those strips as well. Install strips on alternate sides to avoid errors in the pattern and to keep from building unwanted stress into the hull.
The bow and stern present the biggest challenges while stripping. The changes in direction, twist and bow of the strips can make it difficult to keep the joints tight. If you have access to a steam box, it can be a big help. If you don't have a steam box, careful application of heat from a heat gun can make the pieces more flexible. Nick addresses various methods for managing the bow shape in his book.
To keep the keel
as straight as possible, I purchased 1/4" dowels and scarfed several together to create a single keel piece. I then installed the round keel piece to the forms with finish nails (again, leave the heads up so you can pull them later) and a stringline to insure straightness. I then installed full length strips with cove side to the round.
 New update on fiberglass and laquer compatibility. I took a break from the build at the point where I had the deck clear-coated, masked and the hull primed. I temporarily stored the kayak outside in the shade. When I brought it back into the shop and removed the masking I had on the deck, two large areas of the rear deck fiberglass had delaminated. I have removed it and am in the middle of making repairs.


